
이번 글에서는 Android Studio에서 푸시메시지를 수신할 수 있도록 구현하고
디바이스의 고유 TOKEN 값을 얻는 방법을 알아보겠습니다.
1. 우선 firebase 관련 클래스를 사용하기 위해
build.gradle(module)의 dependencies{}에 라이브러리를 추가합니다.
build.gradle(Module)
dependencies {
    ...

    implementation 'com.google.firebase:firebase-messaging:21.1.0'
}
2. 아래와 같이 FirebaseMessagingService를 상속받는 Service 클래스를 생성 하고,
onNewToken()과 onMessageReceived()를 재정의 합니다.
MyFirebaseMessagingService.java
public class MyFirebaseMessagingService extends FirebaseMessagingService {

    @Override
    public void onNewToken(@NonNull String token) {
        super.onNewToken(token);
        //token을 서버로 전송
    }

    @Override
	public void onMessageReceived(@NonNull RemoteMessage remoteMessage) {
    	super.onMessageReceived(remoteMessage);

    	NotificationManagerCompat notificationManager = NotificationManagerCompat.from(getApplicationContext());

    	NotificationCompat.Builder builder = null;
    	if (Build.VERSION.SDK_INT >= Build.VERSION_CODES.O) {
        	if (notificationManager.getNotificationChannel(CHANNEL_ID) == null) {
            	NotificationChannel channel = new NotificationChannel(CHANNEL_ID, CHANNEL_NAME, NotificationManager.IMPORTANCE_DEFAULT);
            	notificationManager.createNotificationChannel(channel);
        	}
        	builder = new NotificationCompat.Builder(getApplicationContext(), CHANNEL_ID);
    	} else {
        	builder = new NotificationCompat.Builder(getApplicationContext());
    	}


    	String title = remoteMessage.getNotification().getTitle(); //수신한 메시지 타이틀 얻어냄
    	String body = remoteMessage.getNotification().getBody(); //수신한 메시지 바디(내용)를 얻어냄

    	builder.setContentTitle(title)
           		.setContentText(body)
           		.setSmallIcon(R.drawable.ic_launcher_background);

    	Notification notification = builder.build();
    	notificationManager.notify(1, notification);
}
}onNewToken() : TOKEN 값이 파라미터로 전달되어 앱을 구분하기 위한 고유한 KEY가 됩니다.
onMessageReceived() : Cloud Server에서 메세지 전송시 호출되며, 사용자에게 보낼 알림을 처리 합니다.
파라미터 remoteMessage를 통해 메시지를 수신합니다.
3. AndroidMenifest.xml에 위에서 생성한 MyFireBaseMessagingService를 등록하고 관련 설정을 해줍니다.
AndroidMenifest.xml
<manifest xmlns:android="http://schemas.android.com/apk/res/android"
    package="com.maejin.samplepush">

    <!--   INTERNET 퍼미션 설정  -->
    <uses-permission android:name="android.permission.INTERNET"/>

    <application
        ...>
        <activity android:name=".MainActivity">
            ...
        </activity>

        <!--   service 추가 후 service 내에 intent-filter 설정   -->
        <service
            android:name=".MyFirebaseMessagingService"
            android:enabled="true"
            android:exported="false"
            >
            <intent-filter>
                <action android:name="com.google.firebase.MESSAGING_EVENT"/>
            </intent-filter>
        </service>
    </application>

</manifest>4. addOnSuccessListener를 등록하여 토큰값을 확인하였을때 자동으로 onSuccess()를 호출 하도록 합니다.
MainActivity.java
FirebaseMessaging.getInstance().getToken().addOnSuccessListener(new OnSuccessListener<String>() {
@Override
public void onSuccess(String token) {
tb.setToken(token);
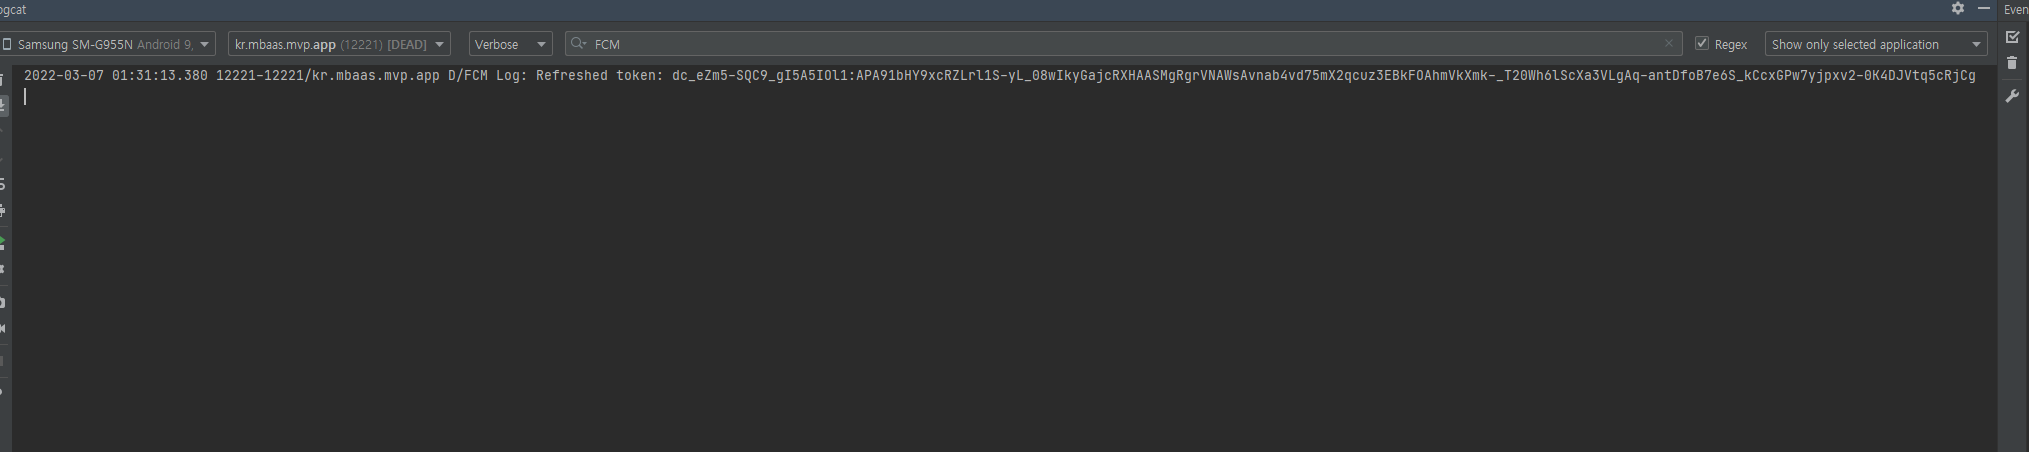
Log.d("FCM Log", "Refreshed token: "+token);
}
});
아래에 참고할 수 있게 MainActivity 웹뷰관련 전체코드 함께 올리겠습니다.
public class MainActivity extends AppCompatActivity {
    public static Context mContext;
    private WebView mWebView; // 웹뷰 선언
    private WebSettings mWebSettings; //웹뷰세팅
    private final static int FILECHOOSER_NORMAL_REQ_CODE = 0;
    private ValueCallback mFilePathCallback;
    private static final String TAG = "MainActivity";

    @Override
    protected void onCreate(Bundle savedInstanceState) {
        mContext = this;
        super.onCreate(savedInstanceState);
        setContentView(R.layout.activity_main);

        //웹뷰시작
        mWebView = (WebView) findViewById(R.id.webView);
        TokenBridge tb = new TokenBridge(mWebView, MainActivity.this);

        mWebView.setWebViewClient(new WebViewClient()); // 클릭시 새창 안뜨게
        mWebSettings = mWebView.getSettings(); //세부 세팅 등록
        mWebSettings.setTextZoom(100); //zoom 100.
        mWebSettings.setJavaScriptEnabled(true); // 웹페이지 자바스크립트 허용 여부
        mWebSettings.setSupportMultipleWindows(false); // 새창 띄우기 허용 여부
        mWebSettings.setJavaScriptCanOpenWindowsAutomatically(false); // 자바스크립트 새창 띄우기(멀티뷰) 허용 여부
        mWebSettings.setLoadWithOverviewMode(true); // 메타태그 허용 여부
        mWebSettings.setUseWideViewPort(true); // 화면 사이즈 맞추기 허용 여부
        mWebSettings.setSupportZoom(false); // 화면 줌 허용 여부
        mWebSettings.setBuiltInZoomControls(false); // 화면 확대 축소 허용 여부
        mWebSettings.setLayoutAlgorithm(WebSettings.LayoutAlgorithm.SINGLE_COLUMN); // 컨텐츠 사이즈 맞추기
        mWebSettings.setCacheMode(WebSettings.LOAD_NO_CACHE); // 브라우저 캐시 허용 여부
        mWebSettings.setDomStorageEnabled(true); // 로컬저장소 허용 여부

        mWebView.setWebChromeClient(new CustomChrome(this));
        mWebView.setWebChromeClient(new MyWebChromeClient());

        //아래와 같이 addOnSuccessListener를 등록한다면, 토큰을 확인했을 때 자동으로 onSuccess()를 호출한다.
        FirebaseMessaging.getInstance().getToken().addOnSuccessListener(new OnSuccessListener<String>() {
            @Override
            public void onSuccess(String token) {
                tb.setToken(token);
                Log.d("FCM Log", "Refreshed token: "+token);

            }
        });
        mWebView.addJavascriptInterface(tb, "tokenBridge");

        //웹뷰에 띄울 URL
        mWebView.loadUrl("http://....");
    }
5. USB를 통해 안드로이드 기기에 앱 빌드시 Logcat을통해 token 값을 확인할 수 있습니다.
얻어낸 TOKEN을 이용하여 푸시를 전송하는 법은
다음 글에서 다루겠습니다.
'IT > FCM' 카테고리의 다른 글
| [푸시알림] SpringBoot에서 APP으로 PUSH 전송하기 (이미지푸시 포함) (0) | 2022.03.08 |
|---|---|
| [푸시알림] PUSH 메시지 전송하기 - Firebase Cloud Messaging (0) | 2022.03.07 |
| [푸시 알림] FCM(Firebase Cloud Messaging) 정의 및 앱 등록하기 (0) | 2022.02.28 |