
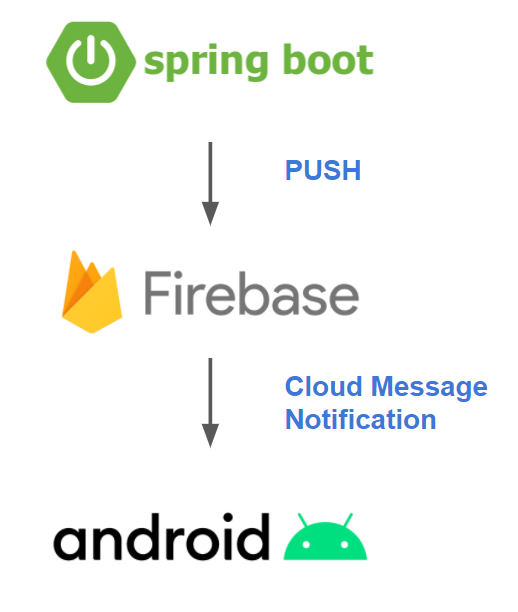
<SpringBoot에서 푸시 알림을 전송하는 FCM Server 구현>
1. pom.xml 설정
<!--firebase-->
<dependency>
	<groupId>com.google.firebase</groupId>
	<artifactId>firebase-admin</artifactId>
	<version>6.5.0</version>
</dependency>

<!--https://mvnrepository.com/artifact/org.json/json-->
<dependency>
	<groupId>org.json</groupId>
	<artifactId>json</artifactId>
	<version>20160810</version>
</dependency>

<!--logger-->
<dependency>
	<groupId>org.slf4j</groupId>
	<artifactId>slf4j-api</artifactId>
	<version>1.7.25</version>
</dependency>위와 같이 필요한 라이브러리를 추가해줍니다.
2. 아래와 같이 패키지 구성
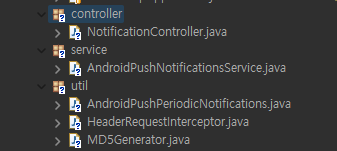
3. NotificationController.java
import java.io.File;
import java.util.List;
import java.util.concurrent.CompletableFuture;
import java.util.concurrent.ExecutionException;

import javax.servlet.http.HttpSession;

import com.mbaas_mvp.entity.PushFileEntity;
import com.mbaas_mvp.service.AndroidPushNotificationsService;
import com.mbaas_mvp.service.PushFileService;
import com.mbaas_mvp.service.TokenService;
import com.mbaas_mvp.util.AndroidPushPeriodicNotifications;
import com.mbaas_mvp.util.MD5Generator;

import org.json.JSONException;
import org.slf4j.Logger;
import org.slf4j.LoggerFactory;
import org.springframework.beans.factory.annotation.Autowired;
import org.springframework.http.*;
import org.springframework.web.bind.annotation.*;
import org.springframework.web.multipart.MultipartFile;

@RestController
public class NotificationController {

    Logger logger = LoggerFactory.getLogger(this.getClass());

    @Autowired
    AndroidPushNotificationsService androidPushNotificationsService;

    @Autowired
    TokenService tokenService;

    @Autowired
    PushFileService pushFIleService;

    @PostMapping(value = "/send")
    public @ResponseBody ResponseEntity<String> send(@RequestParam("title")String title,
                                                     @RequestParam("msg")String msg, @RequestParam("tokens") List<String> tokens, HttpSession session) throws JSONException, InterruptedException  {
    	System.out.println(tokens);

        String notifications = AndroidPushPeriodicNotifications.PeriodicNotificationJson(title, msg, tokens);
        HttpEntity<String> request = new HttpEntity<>(notifications);

        CompletableFuture<String> pushNotification = androidPushNotificationsService.send(request);
        CompletableFuture.allOf(pushNotification).join();

        try{
            String firebaseResponse = pushNotification.get();
            return new ResponseEntity<>(firebaseResponse, HttpStatus.OK);
        }
        catch (InterruptedException e){
            logger.debug("got interrupted!");
            throw new InterruptedException();
        }
        catch (ExecutionException e){
            logger.debug("execution error!");
        }
        return new ResponseEntity<>("Push Notification ERROR!", HttpStatus.BAD_REQUEST);
    }
}디바이스 토큰 값은 안드로이드 앱에서 javascript bridge 함수를 통해 가져와 DB에 저장한 후 List로 불러왔습니다.
4. HeaderRequestInterceptor.java
package util;

import java.io.IOException;

import org.springframework.http.HttpRequest;
import org.springframework.http.client.ClientHttpRequestExecution;
import org.springframework.http.client.ClientHttpRequestInterceptor;
import org.springframework.http.client.ClientHttpResponse;
import org.springframework.http.client.support.HttpRequestWrapper;

public class HeaderRequestInterceptor implements ClientHttpRequestInterceptor {
    private final String headerName;
    private final String headerValue;

    public HeaderRequestInterceptor(String headerName, String headerValue) {
        this.headerName = headerName;
        this.headerValue = headerValue;
    }

    @Override
    public ClientHttpResponse intercept(HttpRequest request, byte[] body, ClientHttpRequestExecution execution)
            throws IOException {
        HttpRequest wrapper = new HttpRequestWrapper(request);
        wrapper.getHeaders().set(headerName, headerValue);
        return execution.execute(wrapper, body);
    }
}
5. AndroidPushNotificationService.java
import java.util.ArrayList;
import java.util.concurrent.CompletableFuture;

import com.mbaas_mvp.util.GetProperties;
import com.mbaas_mvp.util.HeaderRequestInterceptor;

import org.springframework.http.HttpEntity;
import org.springframework.http.client.ClientHttpRequestInterceptor;
import org.springframework.scheduling.annotation.Async;
import org.springframework.stereotype.Service;
import org.springframework.web.client.RestTemplate;

@Service
public class AndroidPushNotificationsService {
//방법1. properties파일로 따로 서버키와 url을 지정후 불러오는 방식
	private static String firebase_server_key= GetProperties.getProperties("push.properties", "serverKey");
	private static String firebase_api_url=GetProperties.getProperties("push.properties", "apiUrl");

//방법2. 변수로 서버키와 url 지정후 사용
	//private static String firebase_server_key="등록한앱의 서버키 기입";
	//private static final String firebase_api_url="https://fcm.googleapis.com/fcm/send";

    @Async
    public CompletableFuture<String> send(HttpEntity<String> entity) {

        RestTemplate restTemplate = new RestTemplate();

        ArrayList<ClientHttpRequestInterceptor> interceptors = new ArrayList<>();

        interceptors.add(new HeaderRequestInterceptor("Authorization",  "key=" + firebase_server_key));
        interceptors.add(new HeaderRequestInterceptor("Content-Type", "application/json; UTF-8"));
        restTemplate.setInterceptors(interceptors);

        String firebaseResponse = restTemplate.postForObject(firebase_api_url, entity, String.class);
        return CompletableFuture.completedFuture(firebaseResponse);
    }
}(방법1) 앱 서버키의 경우 properties 파일로 공통으로 선언후 불러와 사용
(방법2) 변수에 직접 선언하여 사용
둘중 편한방식으로 사용하시면 됩니다.
저 같은경우는 (방법2)로 푸시가 정상적으로 전송이되는지 테스트 후 (방법1)로 수정하였습니다.
properties 사용 시 uitl 패키지에 properties파일을 불러오는 클래스인 GetProperties.java를 생성하였습니다.
(SERVER KEY 확인방법은 아래 5-2 참고하세요)
5-1. GetProperties.java
import java.io.File;
import java.io.FileReader;
import java.io.IOException;
import java.nio.file.Path;
import java.nio.file.Paths;
import java.util.Properties;

import org.springframework.core.io.ClassPathResource;

public class GetProperties {
	static String TITLE_FILE_PATH = "properties/";

	public static String getProperties(String propertiesFileName,String key) {
		ClassPathResource cpr = new ClassPathResource(TITLE_FILE_PATH + propertiesFileName);
		String value = "fail";
		try {
			Path path = Paths.get(cpr.getURI());
			File file = path.toFile();
			FileReader reader = new FileReader(file);
			Properties p = new Properties();
			p.load(reader);

			value = (String) p.get(key);
		} catch (IOException e) {
			e.printStackTrace();
		}
		return value;
	}
}
5-1-2. push.properties
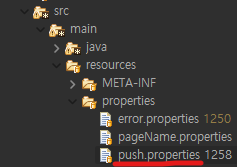
serverKey=서버키
apiUrl=https://fcm.googleapis.com/fcm/send
5-2 SERVER KEY 확인
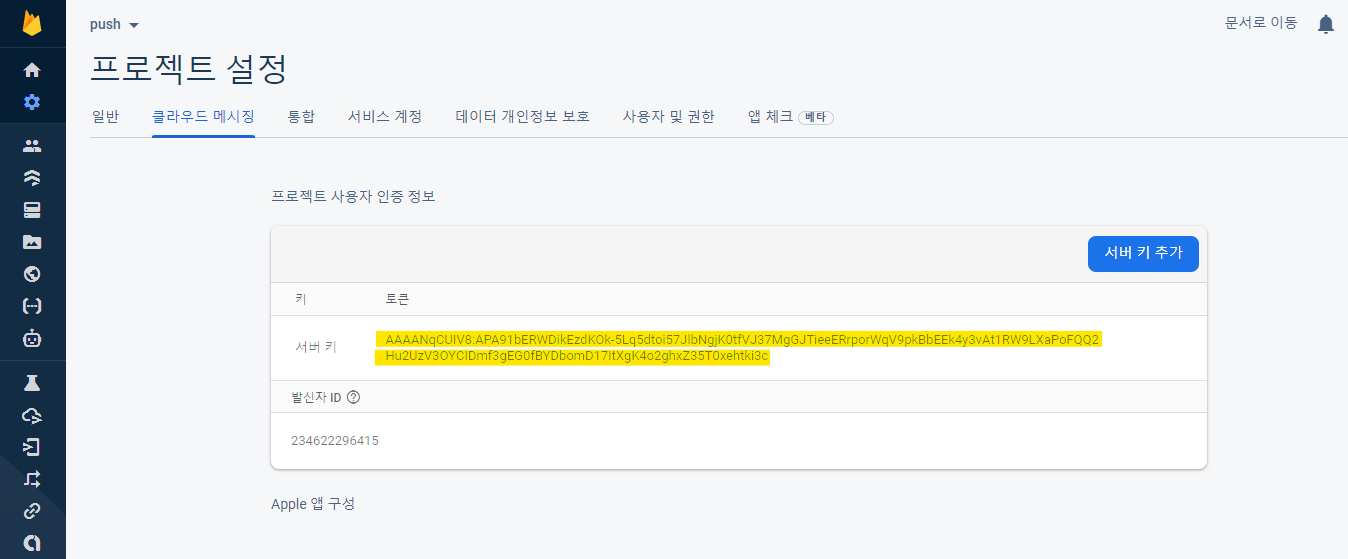
https://firebase.google.com/ 접속하여 로그인 후
콘솔로이동 > 프로젝트 선택 > 설정 > 클라우드메시징
위의 서버키를 복사하여 사용하시면 됩니다.
6. AndroidPushPeriodicNotifications.java
import org.json.JSONArray;
import org.json.JSONException;
import org.json.JSONObject;
import org.springframework.beans.factory.annotation.Autowired;
import com.mbaas_mvp.service.TokenService;
import java.time.LocalDate;
import java.util.ArrayList;
import java.util.List;

public class AndroidPushPeriodicNotifications {
	@Autowired
	TokenService tokenService;

    public static String PeriodicNotificationJson(String title, String msg, List<String> tokens) throws JSONException {
        LocalDate localDate = LocalDate.now();

        List<String> allTokenList = tokens;

        JSONObject body = new JSONObject();
        List<String> tokenlist = new ArrayList<String>();

        for(int i = 0; i < allTokenList.size(); i++) {
        	tokenlist.add(allTokenList.get(i));
        }

        JSONArray array = new JSONArray();

        for(int i=0; i<tokenlist.size(); i++) {
            array.put(tokenlist.get(i));
        }

        body.put("registration_ids", array);

        JSONObject data = new JSONObject();
        data.put("title", title);  //푸시알림 제목
        data.put("body", msg); //푸시알림 내용

        //이미지 푸시 => android studio에서 이미지 수신관련 설정을 해주어야 합니다.
        //data.put("largeIcon", "이미지 URL");
        //data.put("imgUrl", "이미지 URL");
        // 이미지URL 예시 =>   "http://localhost:8080/img/largeIcon.png"
        body.put("data", data);


        System.out.println(body.toString());
        return body.toString();
    }
}주석처리된 이미지 푸시를 정상적으로 동작하게 하기위해서는
Android studio에서 수신관련 로직을 구현해야 하므로 추후 이미지 푸시포함하여 재업로드 예정입니다.
이후 푸시를 전송할 수 있는 .jsp 파일을 생성하여 view단에서 /send 로 요청시 알림이 push 됩니다.
'IT > FCM' 카테고리의 다른 글
| [푸시알림] PUSH 메시지 전송하기 - Firebase Cloud Messaging (0) | 2022.03.07 |
|---|---|
| [푸시알림] Android Studio - 푸시 메시지 수신 설정 / 디바이스 토큰값 얻기 (0) | 2022.03.07 |
| [푸시 알림] FCM(Firebase Cloud Messaging) 정의 및 앱 등록하기 (0) | 2022.02.28 |